DIY Jeep Belly Pan Bolts
Not long after I got my Jeep, I wanted to life it and install bigger tires. So being on a budget, I ordered a cheap kit form RugidRidge. The kit came with a 1″ drop for the transfer case pan. The drop for the belly pan enabled one to install a lift and not have to worry about the angle of the rear drive shaft.
I recently installed a Slip Yoke Eliminator. The SYE allows you to use a Double Cardin (CV type) rear drive shaft. This means that I can remove the 1″ belly pan drop and move it back to it original placement…. or get a tummy tuck kit. It turns out that I thought I had saved the OEM bolts for the pan. But when it came time to reinstall them, I could not find them. The bolt has a special cone shape under the head, this helps align the pan. So a normal bolt really wouldn’t work right, the pan has a matching inverse cone shape seat for the bolt.
After searching on the internet for replacements, someone on Facebook gave me a Jeep part number for the bolts! 🙂 The part Number is: 06035836
So I called my local dealer….. $5 EACH!!! WTF??? And they couldn’t even get me any…lol!!!
Then I thought, like I always think, I will make my own!
Taking the 6 bolts form the the drop, which are too long now that the 1″ spacers are out, I cut off the hex head part and drilled out the center of the cone shape to 1/2″. This is now a cone shaped washer with a 1/2″ hole. I then bought some grade 8 bolts from ACE, @ $1.39, then slipped the home made cone washer on to it. BINGO!!


LED light bar update: COMPLETED!
I have finally finished the LED light bar! It’s installed and works!! 🙂
This project has gone through TONs of changes over the months, even in the last few days I have changed things.


Folding Beer Pong Table
My wife want to make me a beer pong table for Christmas one year. Bless her heart! But it didn’t turn out so well. So I took her idea, and made my own 🙂
Its “regulation” size. Folds in the middle and has folding legs. We are going to cover it with all kinds of beer brand stickers.
Tried it out on new years eve 2012!!! Worked like a champ!!

1000D Cordura Jeep Upholstery with MOLLE Grid Seat Back
My Jeep is a 1997, and the seats are pretty worn out. So I was looking in to getting some new covers for them. I checked online and found some Neoprene ones, and a nice one by Smittybilt, called the G.E.A.R. seat cover. I really like the GEAR one because of the MOLLE system for the seat back. But after much research, the polyester that they make the GEAR out of, does not last very well. And the seat cover bottom does not cover the entire seat well…not a full cover.
So I took it upon myself to make my own! I had toyed with the idea to make a slip-on cover. I ran through lots of designs in my head. The main problem is that it wont hug the seat well, like a normal seat would look. So I decided to take the seat apart, stitch by stitch, and use the disassembled pieces as a template to make a new cover. I cut out all the pieces and sewed it all together. I added my won MOLLE grid system. I wanted to use a materiel better then the GEAR used. I picked 1000 Dener Urethane coated Nylon Cordura…its Mil-Spec!
Cordura is:
- Abrasion resistant
- Waterproof
- Rot Proof
- UV Resistant
- Almost bullet proof…LOL
FYI:
MOLLE (pronounced MOLLY as in the female name) is an acronym for MOdular Lightweight Load-carrying Equipment. It is used to define the current generation of load-bearing equipment and rucksacks utilized by the United States armed forces, especially the United States Army, and its use is also growing in the British Army in the form of the Osprey Modular systems. The system’s modularity is derived from the use of PALS webbing, rows of heavy-duty nylon stitched onto the vest as to allow for attachment of various MOLLE-compatible pouches and accessories. This method of attachment has become a de facto standard for modular tactical gear, replacing the click and stick system used in the earliest modular vest systems (which is still in use with most Western police departments). It is produced for the United States Government under contract by several contractors, such as Specialty Defense, Armor Holdings, Ehmke Manufacturing/High Ground Gear, as well as Eagle Industries
I just need to make some cool pouches to store all my crap 🙂 I already made one, its attached the setback in one of the photos.


General Purpose Pouch w/ MOLLE Grid
In an effort to make some seat covers for my Jeep, like the Smittybilt GEAR ones. I have started testing my ability of sewing. I want the covers to be better then the GEAR ones, so I am going to use Mil-Spec 1000d Cordura, with MOLLE Grid, for the back of the seat.
This GP Pouch was my first attempt. It turned out pretty good. 🙂
Big thanks to DYITactical.com for the design and information on “how to”.


Hand Controlled Throttle
My Jeep is a manual transmission. So when I want to climb rocks or hills, its hard to work the clutch, brake, and the gas with only two feet.
I did some checking and lots of companies make a had throttle, the average price is $35-40. But upon close inspection, they are just made from bicycle parts. A gear shifter and a cable.
So I went to a local bike shop and bought all the parts needed for $12!!!! Their was one part I got from the Jeep dealer, its a Throttle Body Return Spring, it was $6. It has a clip that will attach to an extra point on the throttle body, this made the install REAL easy!
The gear shifter I bought has a thumb screw to adjust tension. But it also will lock it in any position, this means I can kick up the throttle and lock it, if I am running a winch or some other power hungry device. Now I can also use it as a cruse control 🙂 Although I would highly advise against it!


LED light bar update:
This is a update for my LED light bar project here.
I did some quick and dirty tests to help me get an idea if its even worth finishing. here are some photos of a night time test.
- No light at all
- Head lights
- LED Bar
- Both LED and Head lights.
Now the bar only had about 80% of the lenses installed, and of the 80%, only about 85% of them had the right focus degree…The wall was about 30-35 feet away.


3D Printing and more coming SOON!
I have some great projects on the horizon!
-3D printing
-1 axis expansion board for a standard CNC to make it a 3d printer. I think i may make it open source!!
-My own 3d printer design, with unlimited expandability for X-Y-Z axises!
-Finish the LED light bar! (I need the 3d printer first) DONE!
-Put MORE crap on here!!! LOL
This new year is going to be GREAT!!!!!
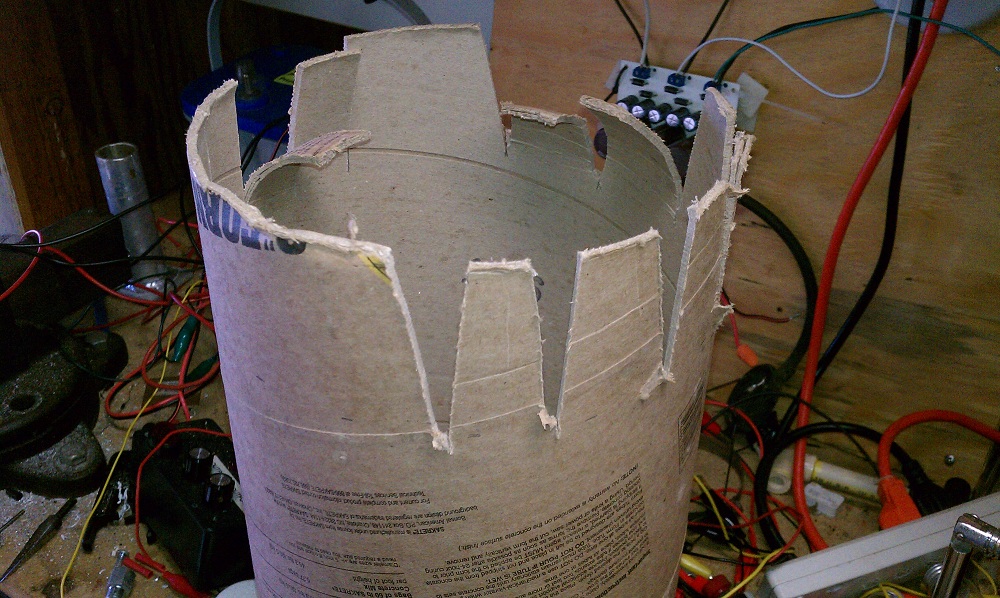
Lego Man Halloween Costume
This is a home made costume I made for my son. My wife was searching for ideas for him and can across some examples, he then demanded that he wanted to be a Lego Man.
The head is some concrete tube form. The body is just a big card board box. The hands are some PVC pipe. The very top of the head is a tuna can. LOL
My wife had the kids stand out side to get some photos. We lived on a busy road. Almost everyone driving by was honking and waving at my son!


Wireless Transmiter & Receiver Relay
This is a pretty simple RF remote link. It transmits at 315Mhz. The transmitter and receiver are both microcontrolled. Dip switches on both devices allow addressing from TX to RX, this allows up to 4 different TX/RX pairs to work in the same location! Dip switches on the receiver set the amount of time the relay is on. This is coded into the microcontroller.
This was intended to be used as a lockout device, hence the delay needed.
Here are some features:
- Very good distance of operation
- Address-ability for TX/RX pairing
- Time out setting for the relay via dip switches
- Wireless transmitter with battery life of YEARS
- Override switch to manually lock on the relay(for testing)
- PNP transistor controlled battery for transmitter; Thus the battery should last years! (with normal usage)