DIY DeWalt Flashlight LED Upgrade
My trusty 18V DeWalt DW919 gooseneck flash light is quite dated by today’s standards. It still has the OEM bulb.
I went to use it the other day and WOW…was it dim. The battery was fully charged, so I know it wasn’t that.
So off to the internet to find a way to make it LED, and bright! After searching for a while I couldn’t find anything good and low cost. So I dropped the idea.
While laying in bed one night, not being able to sleep, it came to me!!
USE A OLD LED POD AS THE LED SOURCE!
The next day I dug through the shop and found a single LED pod. Took it apart and the flashlight…then BOOM!!! Hella bright LED Dewalt flashlight!
The LED board is aluminum, so I mounted it to a 1/4″ thick chunk of scrap I had. I drilled and tapped the aluminum to match the mounting holes in the LED board. This should be good enough for cooling. The LED pod works off voltage from 12v-24v. So the 18V DeWalt is perfect. Had to trim the corners of the reflector to fit inside the flashlight housing. The soldered the leads to the bulb contacts.
The whole thing took about 20 mins to put together.
I am going to cut some acrylic and use some LED collimators. to make a new lens, and make it even better!


DIY Drain Clog Cleaning Stick
You have most likely seen these on TV or at a hardware store. It’s a stick with barbs to clean your sink drain.
They cost about $3+. And the instructions tell you to throw it away when you are done. I hate throwing money away! 🙁
I have cleaned them in the past, but it is a real pain.
I went to the hardware store to grab one, needed it that day. Took one off the rack and had an brilliant idea! Use a long zip tie as the stick, and save a TON of money!! $$$ WINNING $$$!! It take about 2 mins to make barbs down the sides of the wire tie. I used a smaller wire tie as a loop handle at the top.
WORKS LIKE A CHAMP!!!
The cost of 24″ long zip ties are $6.50 for 15pcs. That works out to be $.43 EACH. Now for $.43 I will throw it away! 🙂
Plus you have the added bonus of having the zip ties for other uses/projects!
One way I would make the next one is to heat the razor a little to bend the barb out a more.
Be Careful not to slip and cut yourself!!!


UPDATE: 3D Printed Yoda Bust
Here is the finished product. I had a good friend of mine painted it.
If I had to do it again, I would sweat the bust with a acetone vapor. Just to make it a little smoother.


3D Printed Yoda Bust
It seems in the 3D printing community that a good print on the Yoda bust is the “gold standard”. It has a good amount of detail and lots of over hangs. I have been putting off printing one for years, just never had the time. Always something more important to print.
Recently I wanted to give a Yoda bust to a friend of mine, as a gift. So it looks like it was time to test the limits of my printer!
This was printing on my homemade Kossel Legacy Delta printer with ABS. Using Cura 15 and a layer height of 0.05mm.
I have got to say it turned out fantastic!
I have a good friend of mine doing a custom paint job on it. I will post photos when it’s done.


DIY Tee Shirt Heat Press From A Griddle.
I needed a Tee Shirt Heat Press in a hurry! Didn’t have time to order one, and wait to get it shipped in. So, I made my own. (As you could have guessed)
This project was 100% FREE!! It was made from junk and scrap I had laying around the shop. It cost me NOTHING! And that’s the best price. LOL

I had an only griddle that i was using as a hot plate for SMD soldering. I used my chop saw and removed the rolled edge, that catches the grease. So I ended up with a smooth flat area in the center of the griddle. Then I used some scrap aluminum, and the original foot holes, to mount the holder arms too.

The base was made from some scrap T-Slot aluminum, left over form the grommet machine project. I added a piece of Birch ply wood that i cut to size of the griddle.
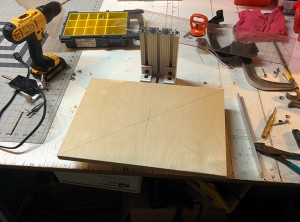
Here is the rising neck of the base.

Took some 1″ bar stock aluminum and made a pressing handle. Then attached the handle to the griddle part with the arms. The handle pivots on the base neck.


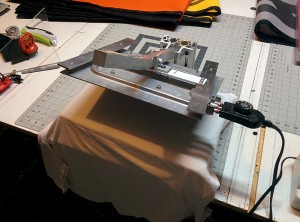
The finished product! It works great. But the heated area is a little smaller then a commercially available machine.
DIY Grommet Machine
I needed a new grommet machine for a second grommet size I use. I was able to find some in my price range, but the machine’s throat was not deep enough. All I could find was about 8-10″ deep. That wouldn’t work.

I got some T-Slot aluminum extrusions on ebay and made my own!

The machine is air powered. I got a 4″ bore cylinder on ebay for cheap! I made a mounting plate out of some scrap 1/4″ thick angle iron I had.
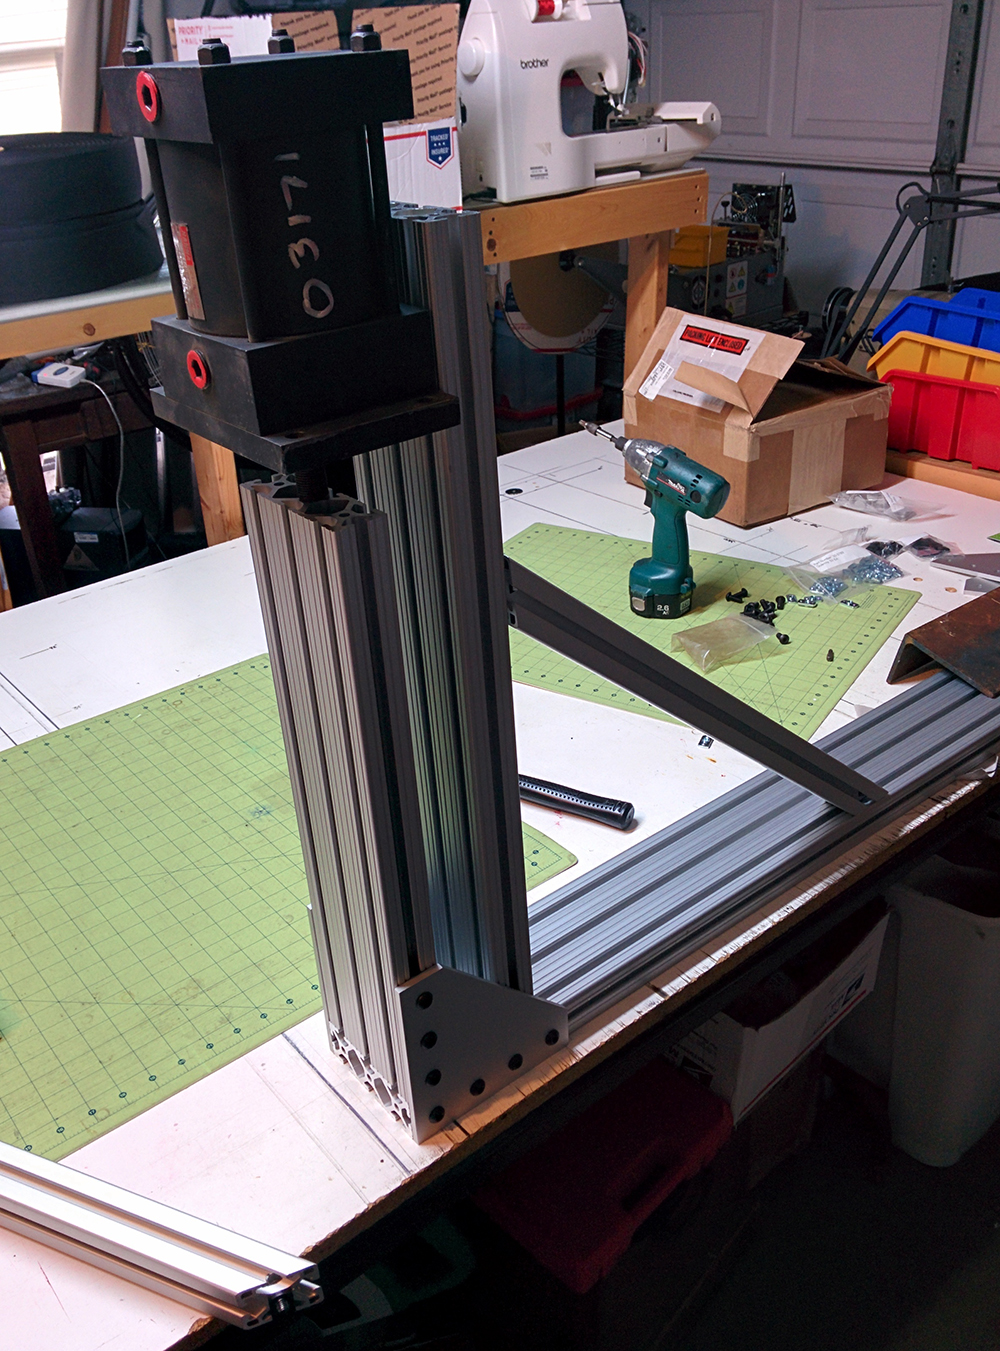
The depth of the throat of this machine is about 28″! The material slips down between the 2 sections of aluminum.

I got a cheap machine table from harbor freight, and mounted the grommet machine to it. It works, but my compressor does not have the air capacity to power it to its fullest. That’s the next buy.
DIY Hot Knife Gun
I needed a hot knife to cut some polypro webbing. Looked on Ebay, couldn’t find anything for a good price. The target was VERY LOW!!
SO, yep … I made my own!
I went to Harbor Freight and grabbed a 200W soldering gun, for about $13.

I had some 1/8″ brass rod laying around. Where the soldering tip would go, I used a 1/8″ drill to drill out the contacts. So the brass rod would fit inside them. The OEM tip was much smaller then 1/8″.

Bent the brass rod into a basic U shape, to get the width I wanted for the cut.

Then bent the legs back to match the opening of the soldering gun.

Here was the tricky part! I smashed it flat on a vise with a hammer. But it didn’t work. The brass fell apart. So I made a new one. This time I put the cutter in the gun, pulled the trigger, heated up the brass. Then smashed it flat. IT WORKED!

This thing works GREAT!! I cut on a piece of glass to keep from melting the table.
Birth of a 3D printer – Part2

This is the CPU mounted on the bottom of the printer.

The hot bed is installed. The hot bed keeps the parts inplace while printing.

Mocking up the towers before making the wooden frame.

ALMOST DONE!!

First running of the firmware for the CPU.

I had to modify the switches to work with my printed parts.
Its all coming along nicely!!
Birth of a 3D printer – Part 1
I have been looking into DIY 3d printing for some time now. I have even went as far as to gather a few parts here and there over the past year. But now I have a real need for one, so I have decided to pull the trigger and get it done!
Originally I was looking into making a ORD BOT style of printer. The cost of the wheel bearings and the MakerSlide t-slot materials was going to cost to much. That’s why I have been putting off the project for this long.
In mid 2012 the Rostock Delta Printer was developed. http://reprap.org/wiki/Rostock The printer featured high speed printing and a very low part count for building it, lower then ORD BOT. Thus I decided to make the Rostock instead.
To save on the overall cost, I sourced all the parts over the internet, rather then buying a complete kit. The only downside to this is that all the part will show up over a 2 week period, and not all at once. I will show case the build in parts, starting with the parts I have on hand.

I ordered the main parts kit on EBay.
I have already installed the metric screws and one of the motors.
![IMG_20131126_093713[1]](http://www.williamhare.portfolioabout.me/wp-content/uploads/2013/11/IMG_20131126_0937131.jpg)
I went with the 8MM sliding bearings, but instead of using precision rod, I used 5/16″ cold rolled rod.
The kit came with a printed Nylon bearing. But it seemed to bind up when it was sliding.

The yoke ends need a rod to connect the 2 together. Some people use wooden dowels, or fiberglass rods from the RC store. I used some 1/4″ aluminum rod I had laying around. It was to big to fit in the yoke, so I had to turn down each end of the rod to fit it on to the yokes.

After gluing the rods to the yokes, I needed a way to keep ALL the lengths the same while it was drying. I layed out some nails on a board, to keep them inline.

Since I am useing printed parts, the holes are a little off form the true size. I dont have metric drill bits, so i can up with a quick fix. Take the metric screw i am going to use, chuck it up in my drill. Put a washer on it, and drill it into the hole. Let the threads do the cutting. It worked great!

After looking at the rods, having the plane aluminum look, and pure board-um, I thought it wold be cool to buff them to make them shine. This should also help reduce wind resistance. LOL

I should have done this BEFORE gluing the yoke ends on -__-

The Rostock is belt driven. I needed a idler pulley for the take up of the belt. I made one from a bearing and a fender washer. I chucked it up in my lathe, and turned down the face of the washer to create the step for the bearing to move.

Here is the step in the washer.

The electronics kit I ordered did not come with ANY instructions, not even on their site :/
So in an effort to figure it out myself, I toasted the 5v regulator on the Arduino 2560 board, you know… the board that controls the entire printer -__-
I had to order a new one form Digikey, but I did learn how to look up the limit switches.
DIY Rugs … for less then $20!
We were moving to a new home, and the new place had ALL tile floors. We needed some rugs to deaden the echo. I went to Lowes to look for some. The avrage price for a 8’x10′ area rug was about $80. That was too much!
I then noticed a remnant of some nice Berber hidden under the full rolls of carpet. I asked the worker how much it was. The price tag said $30, but he could let me have it for $15!! WIN!!
The piece was 12’x6′. So I cut off 2′ from the 12′ side, making a 10’x6′ and a 2’x6’… Yes I got 2 rugs out of it!
I had some tan 1″ nylon webbing, and some tan #69 nylon thread. I used my Yamata sewing machine and a binding feeder and sewed on a edge for the carpet, thus making it a rug! The webbing was on a roll, so it was sewn on in one continuous piece on the edge of the carpet.
Had a little trouble feeding it on my machine, it was big and very heavy. So a few spots got a little wonky. But over all it turned out great!